Ingredients:
- medium flake pie crusts can be used for main course dishes or, by adding the optional sugar, for sweet fillings and tart shells. they contain the same ingredients as other pie crusts, but it's the way the shortening is incorporated into the flour that gives these crusts theirs name and characteristics.
- when you break a medium flake pie crust with your fingers, it separates into flakes rather than breaking clean. a crust that breaks clean is made with short flake pastry. to make a crust short, the ingredients are put together a little differently. short crusts are equally good and used just about as universally.
Directions:
- The Two-Step Method of Incorporating The Shortening
- When you blend shortening into flour to make a pie dough, you want to break it into lots of medium-sized pieces which become coated with flour in the process. By doing this in two steps, incorporating half the shortening at a time, you will create a dough with multiple pieces or pockets of shortening. When your roll this mixture out with a rolling pin, you flatten out all those little pices of shortening which will bake into layers, or flakes, hence the name of the crust.
- Combining the ingredients: In a large bowl, combine the flour, salt and sugar, if using it.
- Cutting or Rubbing in the Shortening: WIth a pastry blender, two knives, or your fingertips, cut or rub half of the shortening into the flour mixture until it resembles cornmeal. Then take the remainder of the shortening and cut or rub it in until the largest pieces are the size of peas.
- Although rubbing in the shortening with your fingertips may sound like just what you don't want to do, this is actually a very effective way to do this job. Your fingertips are usually quite cool so, if you work quickly, they won't really soften the butter much.
- As you become more experienced, you will find that your fingertips will know when the shortening pieces are the right size. You can also lift and fluff the mixture with your fingertips to incorporate air, another ingredinet ina flaky pie crust. The trick with this (or any) method is not to overdo it.
- Adding the Water: By using ice water, you keep the shortening solid and minimize the developement of gluten. You want to use just enough water so the dough will just stick together. Too little and your crust will be crumbly; to much will liberate the gluten in the flour, which can make the final pie cust tough. Sprinkle the ice water, on tablespoon at a time, over the flour/shortening mixture. With a fork, toss together the mixture you've just moistened and push it to one side. Continue until the dough is just moist enough to hold together when you press it.
- Shaping the Dough: Gather the mixture together and cut it into two pieces. If you are making the dough for a double-crust pie, make one piece slightly larger than the other since it has to fit down into the pie plate. Gently press each piece into a round, flattened disk about 4 or 5 inches in diameter. This makes the dough easier to roll out later.
- To Chill the Dough or Not to Chill: Now that you're this far along, you have several options.
- Overnight or Two-Hour Chill: This will produce the most tender and flavorful crust. After you've divded and shaped your dough into disks, wrap them, separated, in plastic or waxed paper and put them in the refrigerator for about 2 hours or even overnight. This re-solidifies the shortening in the dough so it stays in its separate flaky state, it puts the gluten in the flour soundly to sleep, and it also matures the flavor of the dough. In addition to making a more tender crust, it will help keep it from shrinking as it bakes.
- Short Chill: Another option is to chill the dough for a shorter period, form 30 minites up to 2 hours, which will partially accomplish all of those things mentioned above.
- Chilling or Freezing after Shaping: This time roll your crust out immediately after you finish mixing your ingredients and chill the shaped crust, covered, right in the pie plate for 20 minutes to an hour before you fill and bake it. (You can always freezepie crusts at this point so you always have one on hand.) Chiling the shaped crust before baking relaxes the gluten and minimizes shrinkage during baking. You can even chill a filled pie for 10 or 15 minutes, just enough to relax the gluten, which helps keep the crust from shrinking or pulling out of shape as it bakes.
- No Chill: Roll out your crust and bake it (or fill and bakie it) right a way according to the directions below. As with many things, what you gain in time, you lose in flavor and texure but if you haven't overworked your dough during the mixing process, this method will still produce a pretty good pie crust.
- Rolling Out and Shaping a Single or Bottom Crust: If your dough has been in the refrigerator for more than an hour, give it 10-15 minutes at room temperature to soften a bit.
- The simplest way to roll out your dough is on a lightly floured surface with a floured rolling pin. (Give your rolling pin an occasional rubdown with a good quality vegetable oil. It is not only good for wood, it will help prevent it from sticking to a dough.)
- Or roll your dough between two sheets of floured waxed paper, which gives you a bit more control and makes it easier to get the crust into a pie plate.
- If you want to gea t bit more high-tech, you can buy a pastry cloth and sleeve for your rolling pin at most hardware stores. They are not critical to making a good pie crust, but they eliminate sticking and make it easier to get the dough into a pie plate.
- Roll the dough from the center to the outside edge in all directions. Do it gently, without pushing down hard, because you don't want to squeeze out any air that is lurking in the dough. Use a spatula or bowl scraper to loosen it if it begins to stick, and throw a bit of flour underneath to keep it loose. Ditto with your rolling pin.
- By rolling form the middle out to the edges, you enlarge the dough without making it stretchy, which happens when you go back and forth over the whole thing. This helps keep it form shrinking when it bakes.
- If the crust tears or splits, just patch it by moistening the edges and pressing some excess dough on the wound. Dust it with a bit of flour, top and bottom, before you begin rolling again. If the wound is on the bottom crust, no one wiill see it, if it's on the top, only a grouch will care.
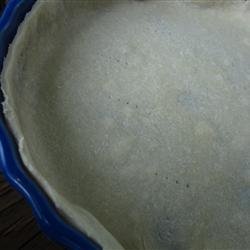
- Single Crust Shell: Roll the crust until it is about 1/8-inch thick and about 2-inches larger than the diameter of the pie plate. This gives you enough to make a good high rim. If you turn your pie plate upside down on the dough, you'll be able to figure out just about how big to roll it.
- Double-Crust Bottom:This one can be a little smaller, about 1 1/2-inches larger than the diameter of the pie plate.
- Latticed-Crust Bottom: Roll this out 2-inches larger than the diameter of your pie plate as this piece needs to come up and over the edges of the lattice.
- Getting the Dough into the Pie Plate: If you've rolled the dough directly on the table, slide a spatula or bowl scraper under it and make sure it's completely loose from the rolling surface. Then fold it in half gently (or fold it over your rolling pin) and slide it onto your pie plate.
- Unfold it and settle the dough down into the pie plate by lifting and pressing it. Don't stretch it to get it into place since that makes it want to pull into a funny shape while it bakes.
- If you've used waxed paper or a pastry cloth, upend the plate onto the dough, slide your hand under the paper or cloth and turn the whole thing over, putting the dough, hopefully, right where it should be in the pie plate. Trim the dough all around so it isn't too ragged and uneven, leaving yourself as much dough as possible to flute the edge.
- Sealing the Bottom Crust: If you have a juicy filling, brush the bottom piece of dough with a little melted shortenning or egg beaten with a bit of water. This keeps the juices from soaking inot the crust and making it soggy. (Omit this step if you are prebaking the crust.)
- Rolling Out & Shaping the Top Crust: A top crust is usually rolled a little thinner than the bottom crust, but don't be too concerned about this.
- Double-Crust Top: Since it needs to go over a filling and then under the edge of the bottom crust, you need to make it about 1 1/4 inches larger than the diameter of the plate. This size will give you a bit of leeway. You can always trim off what you don't need.
- Pour in the filling and then moisten the edges of the crust with a little cold water. Cover the filling with the top crust. Again, trim anything that's too ragged.
- Decorating and Glazing: Another way to be creative with your top crust, either solid or latticed is to use some of the dough scraps to decorate it. Cut them into leaves, flowers, or something that is symbolic of what is in the pie or the occasion the pie is for. Stick these on iwth a bit of water, or egg beaten with bit of water.
- You can always bake a pie as is, but it some instances a wash or glaze makes it more attractive. Plain milk or cream will make a browner, shiny crust. An egg whie or yolk or both, beaten with 1 of 2 teaspoons of water will intensity the color and create a gloss; the egg white wash will be clear, the whole egg or egg yolk wash will be bronze.
- A pastry brush does a fairly good job of painting on a wash but if you can get hold of one, a goose feather brush, available at many kitchen supply stores, does the best job. It spreads the wash evenly, doesn;t exert any pressure on the dough and can be easily rinsed out and used many times. It's also reassuring to use something so primitive and know that modern technology can't improve on it.
- If you have added pastry scrap decorations, an extra coating of wash will make them darker and more visible.
- A sprinkle of sugar over an egg wash adds texture and makes the crust browner.
- Baking: If, while a pie is baking, you find that the edge of the crust is browning to much and too fast, make a shield for it out for it out of tin foil or turn down the heat.
- A Blind Crust: This crust is used for fillings that are not baked, or are baked for only a short time. Fit a piece of aluminum foil on the inside surface of a single crust shell and fill it with something that will mimic a filling. This helps the crust keep its shape while baking. You can use anything from dried beans to small stones (washed free of grit) or special aluminum pellets that are speciality made for thispurpose. (Keep this blind filling in ajar to use again.) Fifteen minutes before you want to bake the crust, preheat your oven to 425 degrees. Bake for 12-15 minutes. If the bottowm begins to bubble up give it a jab with a a fork to make it go back where it belongs. Let it cool thoroughly before filling.
Nutrition Facts
| Amount Per 1 Serving | |||
| Calories | 0 Kcal (0 kJ) | ||
| Calories from fat | 0 Kcal | ||
| % Daily Value* | |||
| Total Fat | 0g | 0% | |
|---|---|---|---|
| Amount Per 100 g | |||
| Calories | 0 Kcal (0 kJ) | ||
| Calories from fat | 0 Kcal | ||
| % Daily Value* | |||
| Total Fat | 0g | 0% | |
|---|---|---|---|
* Percent Daily Values are based on a 2000 calorie diet. Your daily values may be higher or lower depending on your calorie needs.
Find out how many calories should you eat.
Get Your Recipe of Health!
Follow RecipeOfHealth on Facebook!

